
This is part 2 of a two part series on The Steps to Great Color. Part 1 defined the goals of the color process and outlined the steps for Creating the Vision. If you missed it, you can read it here:
The color process can feel stressful and chaotic, but it absolutely does not need to. Over the years, I’ve worked with clients to turn it into something structured, collaborative, and gratifying.
In this issue and the previous one, I’m sharing the exact steps I have seen work again and again. This is the color process I use and love.
As I mentioned in Part 1, the color process is divided into two main phases:
Creating the Vision
Achieving the Vision
The first phase is where the color strategy for the season is designed. We covered the details for that in the last issue.
Now, we’ll dive into the second phase: Achieving the Vision. This is where the color strategy comes to life.
Achieving the Vision
In Part 1, the macro trends, consumer sentiments, and key colors for the season are identified. This is also where the color palette and merchandising plan are designed and finalized.
In Part 2, it’s time to apply those assets to the product line.
At this point in the process, it’s usually been several weeks since the beginning of Part 1. In that time, product designs or decisions have advanced. Fresh sales data has come in. Marketing insights are sharper. The brand has evolved. This new information needs to be shared and integrated into the color process. The color process works best when it is incorporated into a healthy brand ecosystem - where it informs and is informed by developments across brand departments.
The key focus now is color merchandising the product line - taking the ideological plan created earlier and making it reality. This part of the process has a wonderful balance of art and math. Color has to logically populate the line, fulfill jobs, be cohesive, and make manufacturing and budgetary sense. But it also needs to be beautiful, to tell a story, to have a unique energy, and to capture the brand’s voice. It needs to have meaning in all sense of the word.
Now, the steps to achieve that -
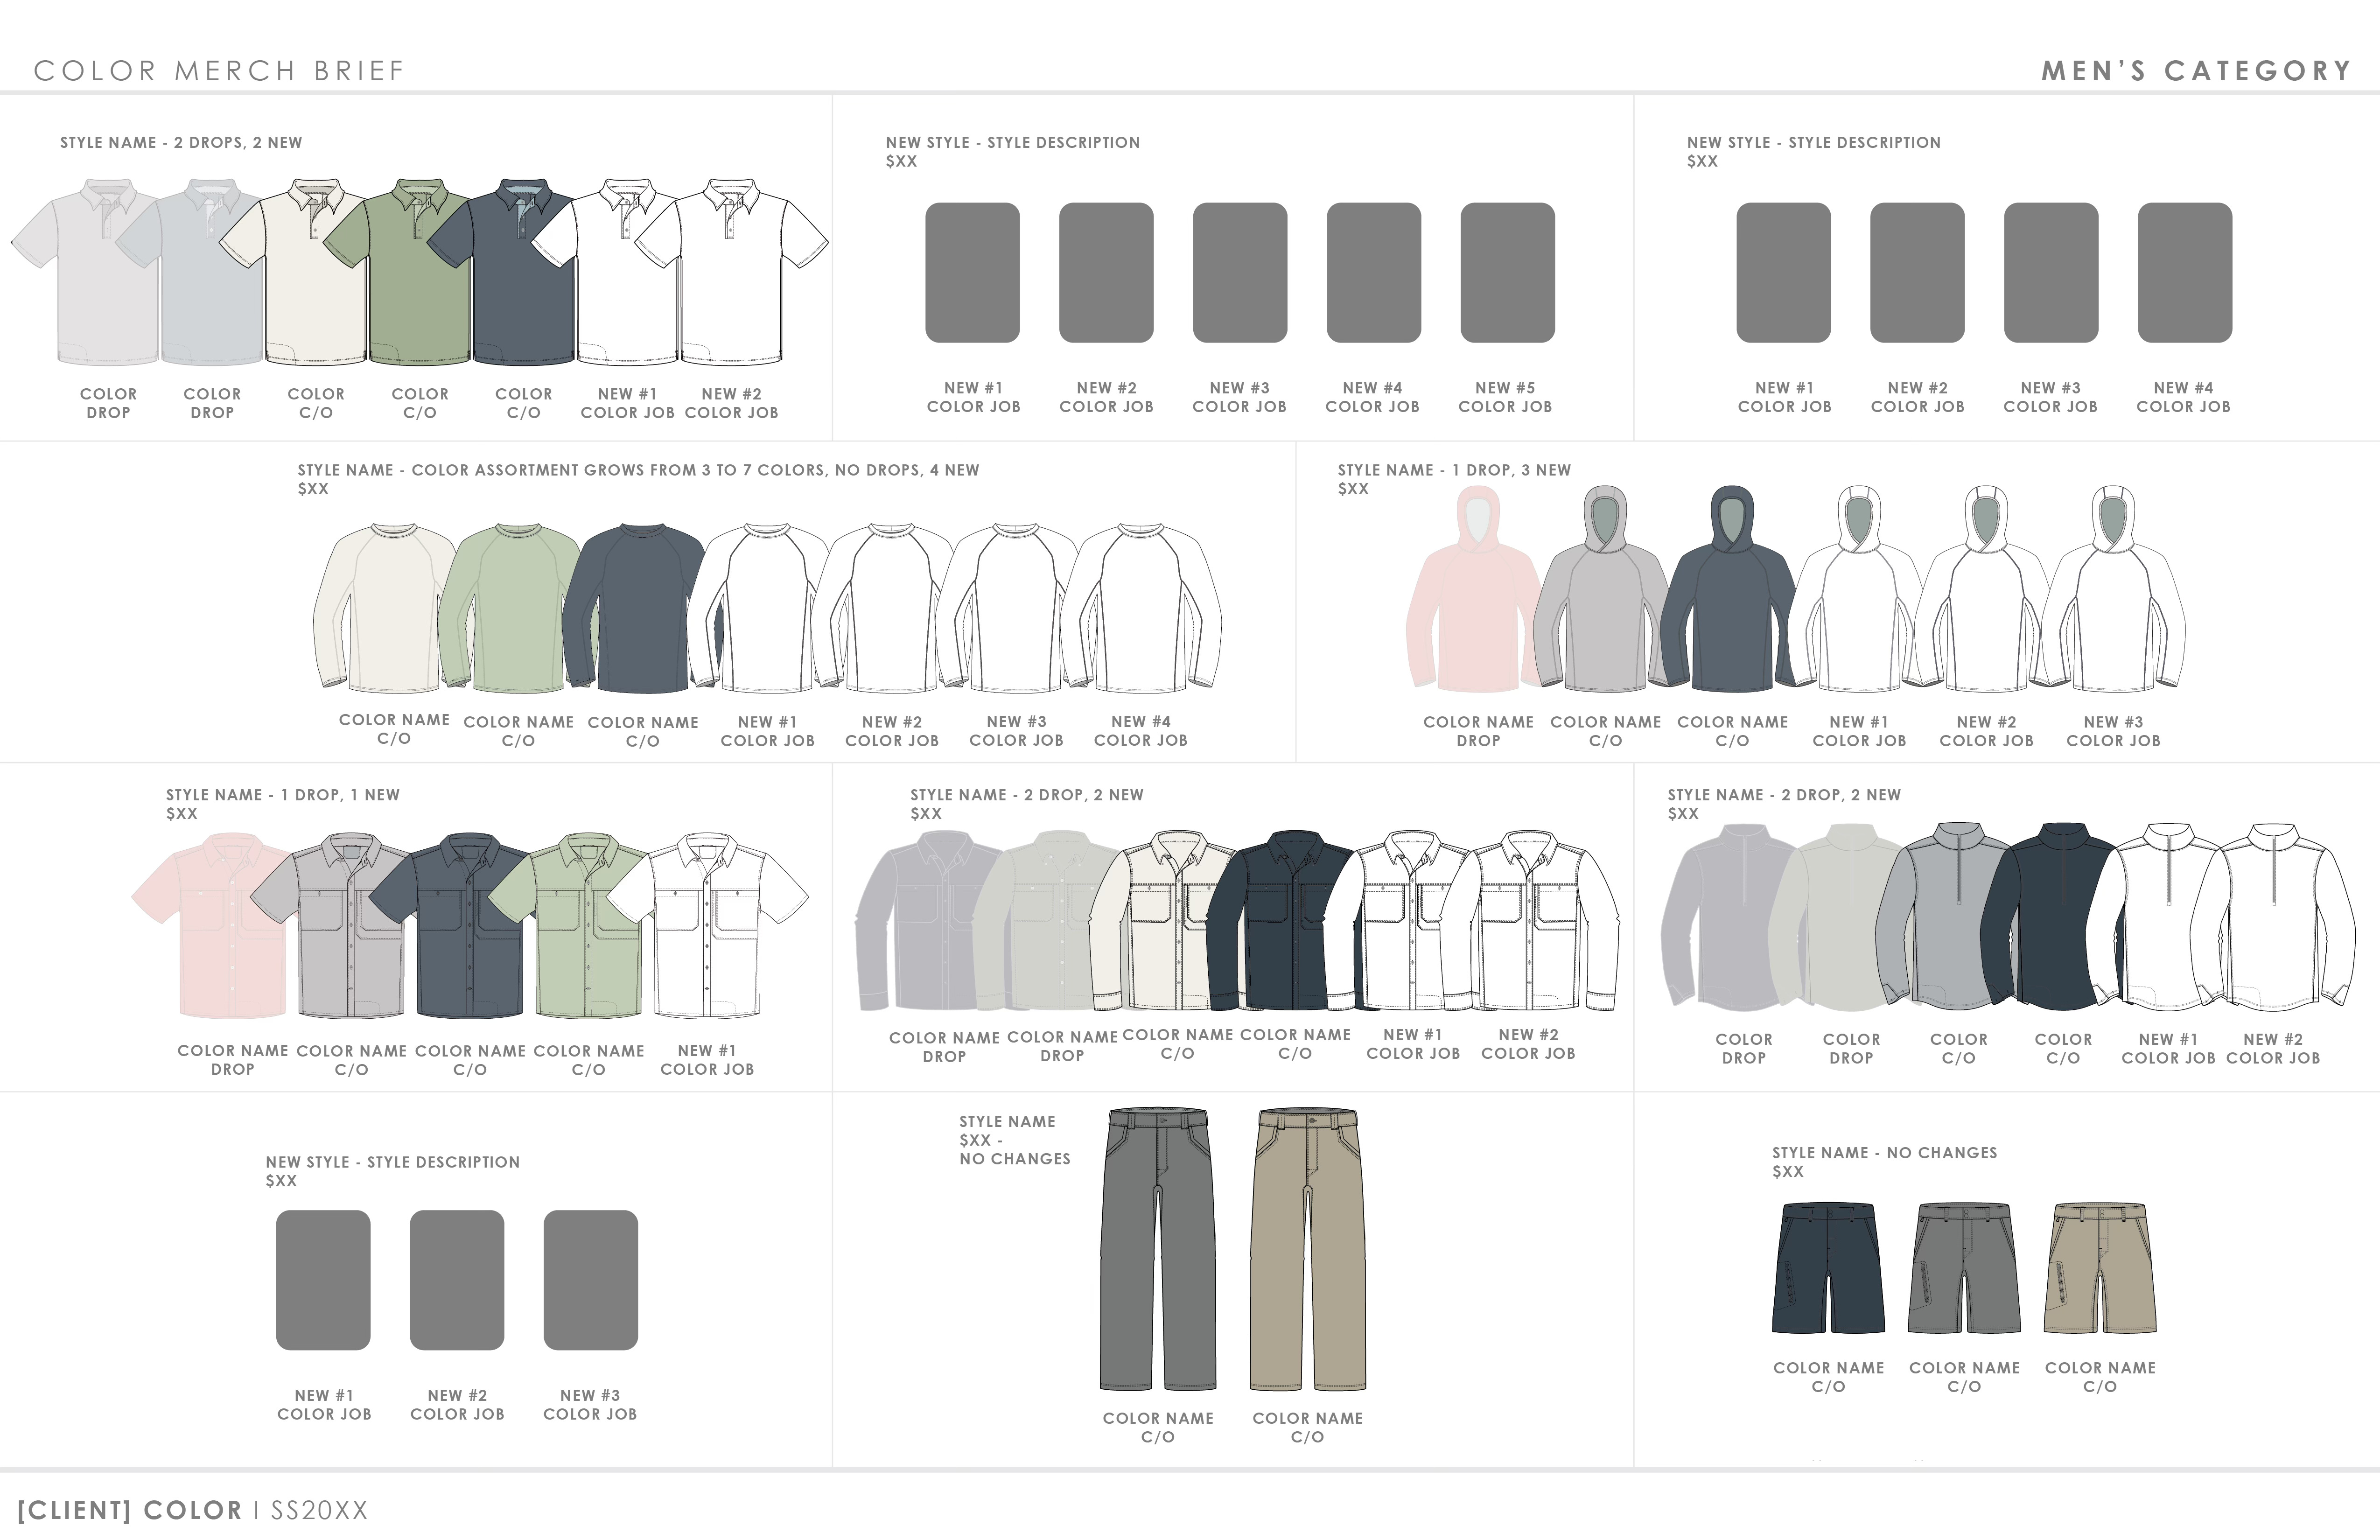
Step #1. Color Merchandising Brief
The first step is to create the color merchandising brief. This is done by the client. Because it will be referenced throughout the process, this needs to be a document.
Think of the brief as the color rulebook for the season. It transforms the brand’s broader, seasonal color goals into specific, actionable directives.
It should include:
Every style (new or carryover) that needs new color.
The number of new colors needed per style.
The job each new color needs to do.
All carryover styles + colorways (to see what the new colors need to merchandise with).
Category and product positioning (so color can reflect this).
Any material or manufacturing limitations.
The easiest and clearest way to communicate all this is through a visual line plan (VLP). Take last season’s VLP, gray out what drops, keep styles and colors that carryover, and add placeholders (blank lineart or a simple shape) for new styles and color additions. For each color addition, note the color “job” - color type (core, progressive, etc.), who it’s for, how long it will live in the line, and what it needs to merchandise with.
Add supporting details: material callouts, pricing tiers, positioning info, competitive insights - any relevant information. Then, go over the brief in a working meeting. Make sure everyone is aligned before continuing to the next step.
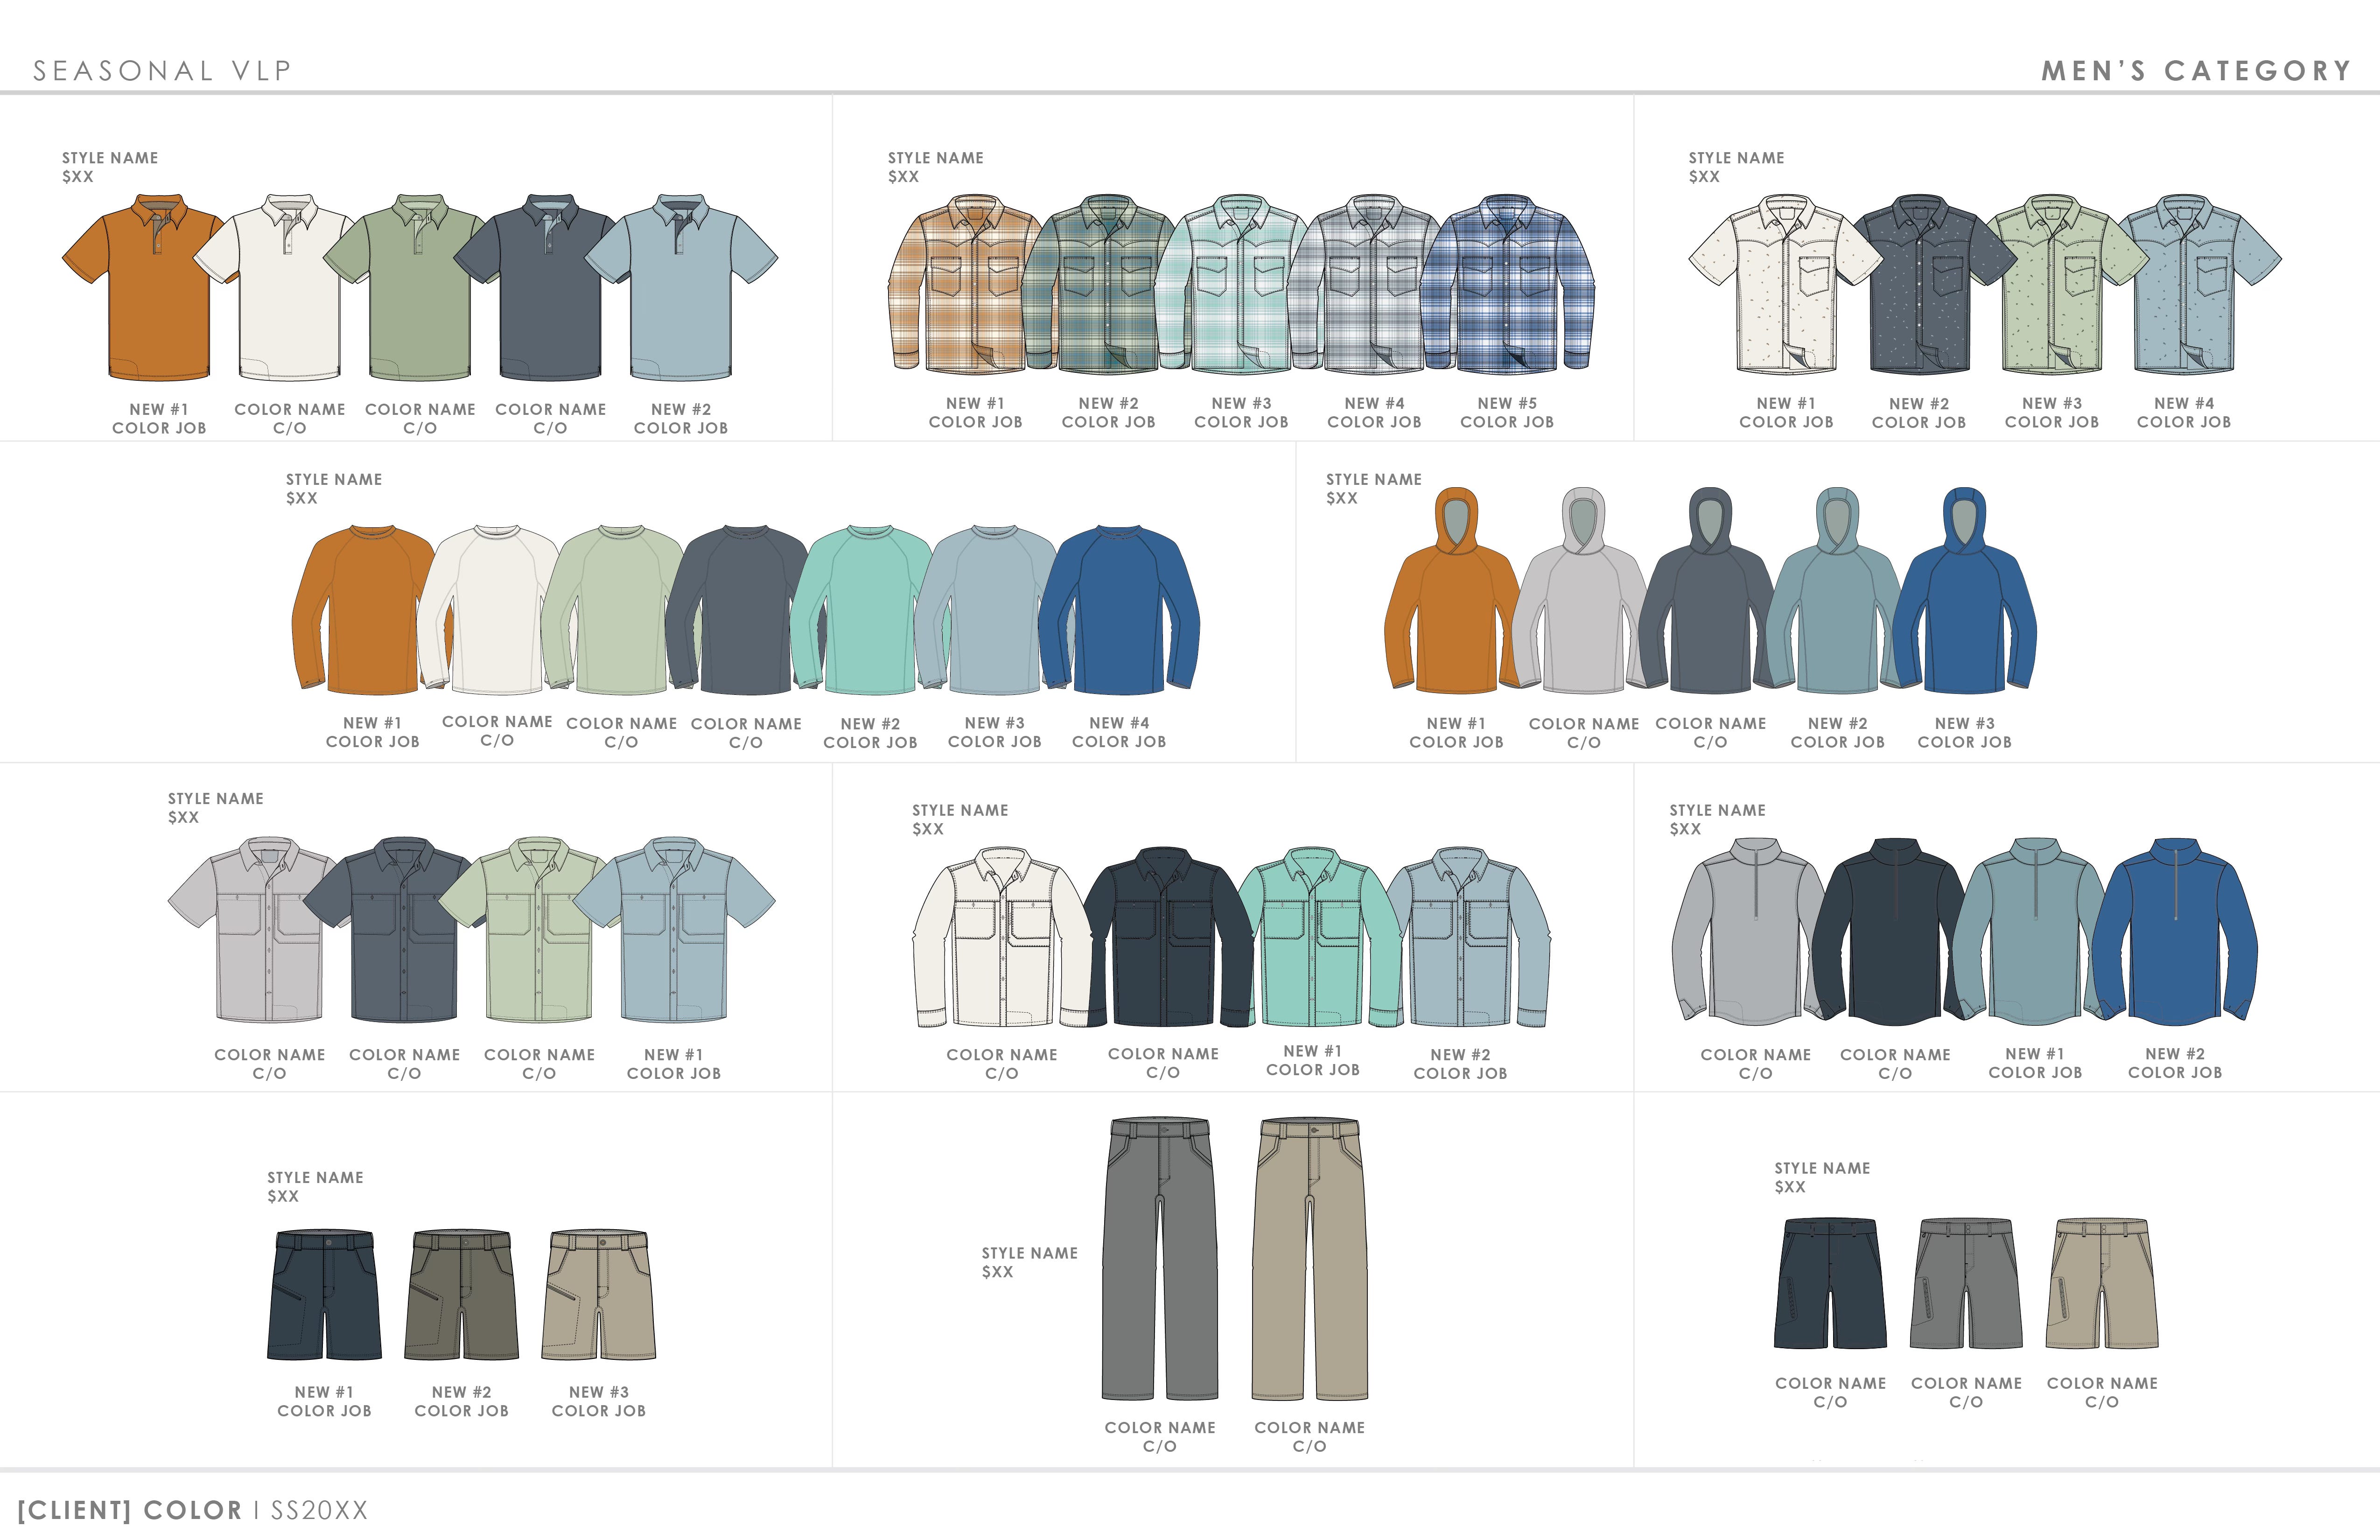
Step #2. Color the Line
This is where the magic happens. It is also one of my favorite parts of the process. I love coloring a line.
Here, the entire product line is color merchandised. This is done by following the trend direction, color stories, and merchandising plan created in Part 1.
Choose colorways that are meaningfully different from what’s been done before, what colorways will drop, and what colorways are carrying over. This makes the line look fresh and continues to give consumers and retailers a reason to buy. (No retailer wants to put an “old” blue on sale just to bring in a “new” blue.)
To help, I often create a visual archive of historical colorways by style. This way, I can reference what’s already been done and ensure the new proposed color is innovative and moves the brand forward.
As new colorways are selected, vet them:
Make sure each fulfills the assigned job.
Check that they merchandise across the line.
Ensure each has friends - meaning, it shows up multiple times so it feels intentional.
This is the time to experiment. Play with color application, blocking, and trim options. See what feels right and exciting. Smart exploration here leads to a more compelling line - and that leads to a more compelling brand.
Then, distill this ideation into a clear, focused assortment with a strong point of view. Check that it achieves the targeted vision. Supplement this with select backup colorways. (Keep these tight and differentiated so they don’t overwhelm.) This helps drive healthy dialogue during the reviews and makes figuring out revisions easier.
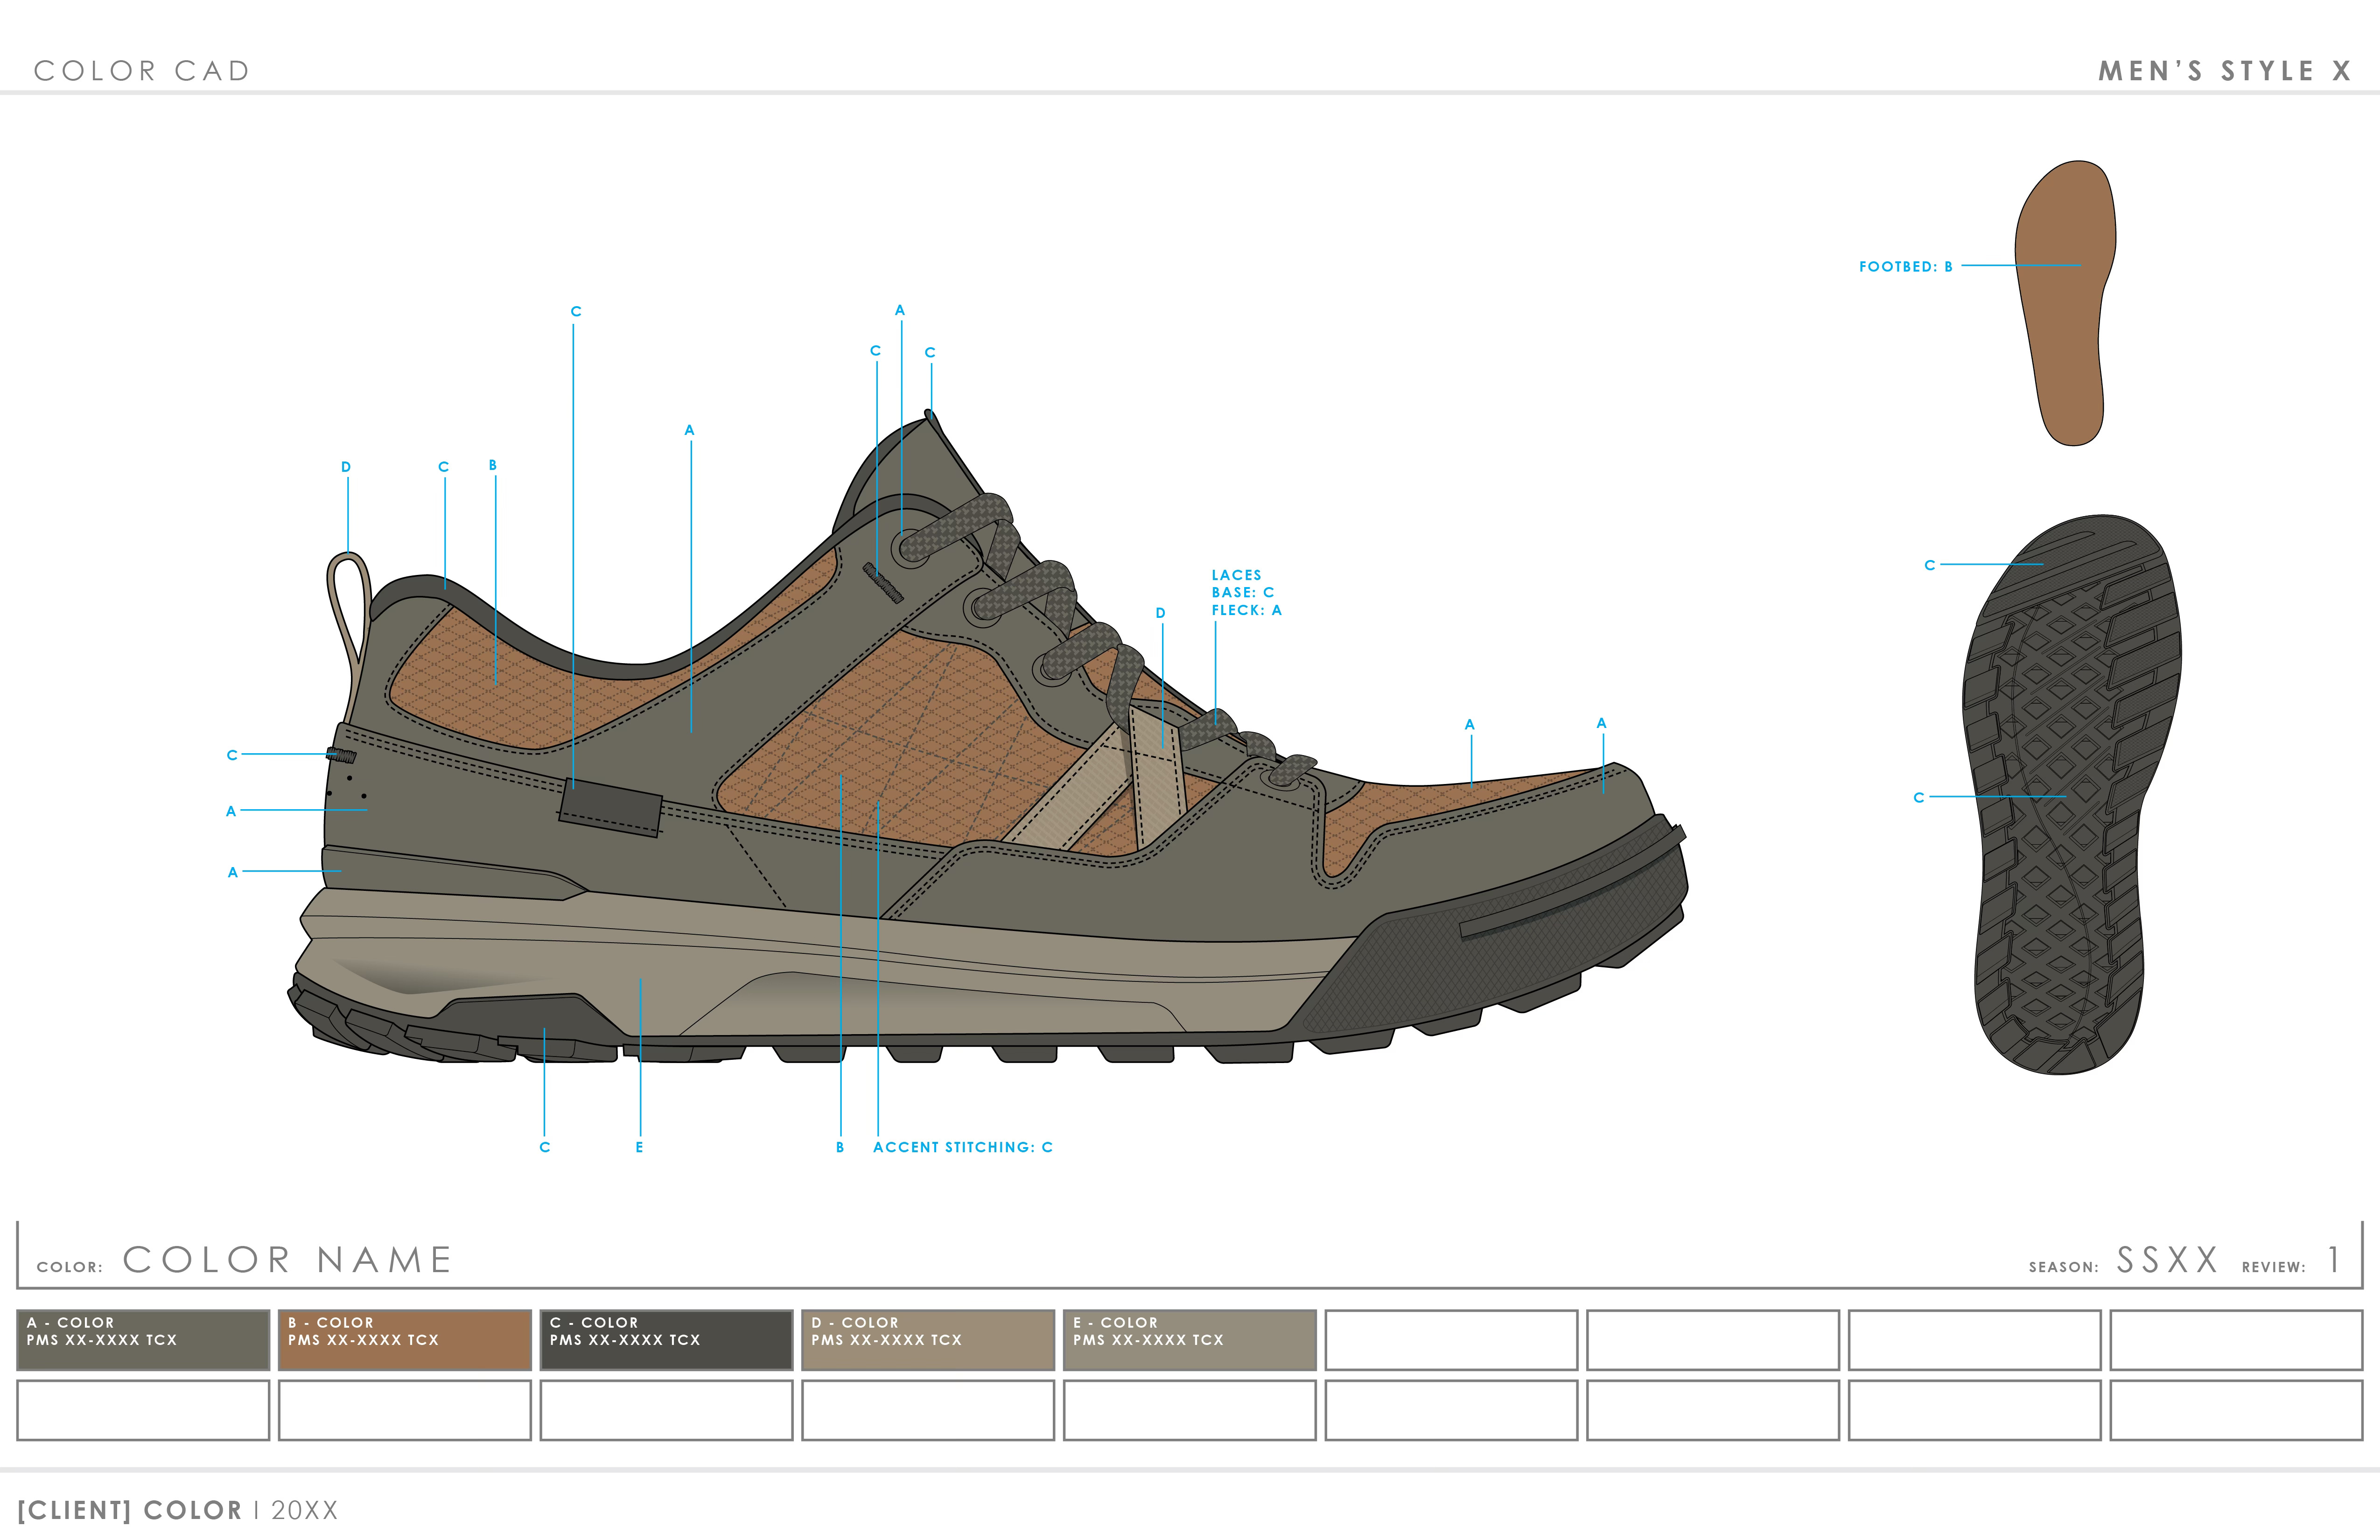
The final deliverable from this step is a fully merchandised line presented through color stories, a VLP, or both. Often - especially for more detailed products - I create individual color CADs for each colorway as well, showing the exact colors and placement per style.
Step #3. Review 1 - Small Group
Time to share the work.
The first review is typically with a small group - the same team who helped shape the strategy in Part 1 (design and product line management).
This can be a pretty fun meeting, especially if this group has good synergy. The team reviews the proposed and backup colorways. They may move options around or suggest new ones. Especially if this team has worked on the design of the products, they tend to have excellent insight and ideas on how to maximize color’s impact, innovate on what’s been done before, and capitalize on materials and features.
By the end of this step, the goal is alignment on the proposed assortment, a narrowed backup list, and a line that feels powerful and directionally sound.
The line is revised and updated.

Step #4. Review 2 - Large Group
Next, bring in the broader team: usually, sales, marketing, operations, development, and often, the brand president. The small team from the first review also joins.
This review is about cross-functional alignment. Seeing the vision actually applied to product is usually incredibly helpful to this larger group. It’s an understandable way to see how color supports the brand’s goals - and gives the season energy and oomph. Expect more vocal input in this review with this team during this step of the process versus the equivalent step in the Creating the Vision phase. It’s simply much easier for people to comprehend the color strategy when they can see it in action.
It’s crucial to present color here with a strong point of view and with precise explanations as to how the line achieves the strategic creative vision. Lead with clarity and confidence. Without this expertise, this meeting can quickly turn into a color-by-committee nightmare.
As feedback is shared, make thoughtful revisions while protecting the larger color narrative.
The goal at the end of this review is to align on the proposed colorways and reduce backup options to only those that will get sampled or are serious final contenders.
Again, the line is revised and updated.
Step #5. Review 3 - Retailers + Reps
This step is optional, but valuable if done right.
Share the line with key retailers and sales reps, potentially brand ambassadors as well. Ask for feedback, and have them rank their preferences. This helps identify hits, potential risks, and areas to support with tools such as trend insights, merchandising tips, or sales programs.
Filter the feedback appropriately. Consider who it’s coming from, their market, their biases, their priorities. Remember that most of their opinions are based on what works in the present and the past, not what will resonate in the future.
Use this feedback to help inform the final color selection. But an important note here - always make color decisions based on what reflects and elevates your brand’s unique values, mission, and voice. Don’t echo someone else’s or lose sight of what makes your brand exceptional.
Finalize the line. Send out proposed and select backup colorways for sampling.
Step #6. Review 4 - Samples
In this step, actual samples are reviewed. Evaluate how the colors translate onto product, how they merchandise, and if the 2D vision is as dynamic as the IRL reality.
Start with the small group. Flag any corrections or final tweaks. Then, share with the larger team.
At this point, the final color selections are made.
Step #7. Final
The fully merchandised line is locked.
The VLPs and/or color stories are updated to reflect the final colorways. These are shared across departments so everyone can start planning for the seasonal launch.
Finalize color CADs and send them to the factories for sales samples, and eventually, production.
And finally: take a deep breath. Give high fives all around. You’ve done it.
And there you have it - The Steps to Great Color that have proven successful season after season, brand after brand.
I’ve seen these steps transform the way teams work with color.
And, I’ve seen these steps make a huge positive impact on how a brand’s color is received and loved.
If you want to level up your color process and make it more lucrative and less stressful, reach out.
Take care,
Dawn Rae
If you found this helpful, subscribe and share below. I appreciate both!
I help brands understand what their customers will love and value in the future, and I create the color design + trend strategy to get them there.
I design client-specific seasonal trend forecasts, color palettes, and color merchandising plans. Find a full outline of my services here.
If you are curious about working together, reach out: knoth@dawnrae.com.
Connect with me elsewhere:
website: dawnrae.com
socials: LinkedIn Substack
Creative Intelligence: all issues